10 Easy Steps to a Clutter-Free Office
More of us than ever before are working from home. A clutter-free office allows you to feel more comfortable, and therefore more focused, and productive. These 10 easy steps apply to any office, whether or not it’s a dedicated room, and no matter where it’s located.
A quick, easy decluttering of your workspace does not make you organized, but it does set you up for successfully finishing the organizing project at your own pace, while simultaneously allowing you to experience the freedom and focus that a clutter-free office can give you.
You still have some sorting, purging, organizing, and filing ahead of you, but you can start enjoying your clear desktop and functional workspace immediately.
A clutter-free office allows you to feel more comfortable, and therefore more focused, and productive. Share on X
10 Easy Steps to a Clutter-Free Office:
Step 1
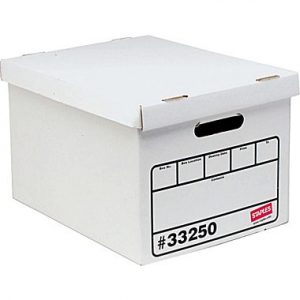
Buy some new boxes. These are for sorting papers (and other stuff) into broad categories. I like the “Economy Storage Boxes” from Staples (pictured). The important thing is that they are a manageable size (not too heavy if loaded with papers or books); that they have lids; that they are uniform in size and appearance; and that they stack well. Get a pack of 10. The less stuff you have, the less full the boxes will be, but most people have several categories of stuff.
Step 2
Label the boxes with a black Sharpie on large Super Sticky Post-its (so you can change the categories, if needed, as you sort, and reuse the boxes later).
Here are some suggested categories: PAPERS (nothing urgent, to sort and purge later, not now); OFFICE SUPPLIES (including networking clutter); DECOR (including memorabilia); PROJECT A (an active or inactive project with lots of papers); PROJECT B (you can combine multiple projects in one box, but only if they don’t overflow); TO FILE (you already know you need to do some filing, but you haven’t done it yet because you need to set aside some time for it, clear out your existing files first, and/or create some new folders); PUT AWAY (it belongs in another room…but don’t leave the room in the middle of an organizing session to put things away! Do it later).
Other categories, although you probably don’t need all of them, and you could also use trash bags for some of them, might include: TRASH, DONATE, GIFT, SHRED, RECYCLE, SELL.
Step 3
Designate one of the boxes URGENT & IMPORTANT (or whatever words have similar significance to you). That’s where you put the bills that you find that need to be paid; your long-lost excavated passport; and anything else that you will need soon, or has a due date, or you don’t want to bury in a stack of boxes.
Step 4
Clear ALL surfaces, and put each item you find into the proper sorting box. Surfaces include your desk; your work table; the top of your file cabinet; the window sill; the floor. (If you have extraneous little pieces of furniture that are too big to put into boxes, remove them from the room too. You can put them back later if you really want to.) Don’t forget the walls (maybe leave your wall clock and favorite large piece of artwork, but definitely clear your bulletin board and little notes and reminders and start fresh), and the space on the bookshelves on top of, and in front of, your books.
Step 5
Put the lids on the boxes and stack them in a corner, or along a wall, leaving the URGENT & IMPORTANT box on top for easy access.
Step 6
Start using your clutter-free desk and work surfaces! Since you have labeled all the boxes you will know which one to open if you really need something while your organizing project is still in progress.
Step 7
Schedule time for purging and/or finding new homes for the things in the boxes. Tackle one box per day, or per week (depending on your motivation, availability, and energy). I’m not suggesting you delay on purpose, but the longer you take (as long as the boxes aren’t in the way and aren’t bugging you), the more likely it is that you will realize you don’t need all of the things in the boxes anymore.
Step 8
Be ruthless about what stays in your space and what goes. Your desktop is prime real estate, so keep out only what you use several times a day so you also have room to work. Find homes in drawers, or on shelves, for everything else that you regularly need access to. If you can’t get rid of it, but don’t use it often (such as excess office supplies, or old client and tax files) consider storing them in a closet or out in the garage (in a protective container).
Be ruthless about what stays in your space and what goes. Share on XStep 9
If you need help, call a friend, or a professional organizer.
Step 10
Enjoy your clutter-free office, peace of mind, and new-found productivity!
Once you have worked your way through the pile of boxes, you can take it up a notch by making improvements that will allow you to actually fall in love with your office!
Is your office full of clutter?
Do you think these steps will help?
Please share your thoughts in the comment section below!
—————————————————————————
Copyright 2015-2020 by Hazel Thornton, Organized For Life.
Social media links directly to this page are encouraged!
Please contact me for other types of reprint permission.
—————————————————————————
Share this:


Looks like you covered everything Hazel! I’d add just one thing though. When collecting all those notes from the bulletin board, stick them into a notebook so they’re all in one place. In future, use the notebook for notes and skip the ones tacked to the bulletin board.
Yes, de-cluttering is one thing. Keeping it de-cluttered by finding homes for your things and maintaining the systems you create is a whole ‘nother thing!
You are so right about your desktop being prime real estate! This year I am trying something new and instead of having one inbox on my desk I have three drawers, a To Do drawer, a Family drawer, and a Business drawer. It was too difficult having everything in one inbox. It piled up too quickly. Now I know if it’s in the To Do drawer it needs to be done ASAP and if it’s in the other two it might be for reference or to file.
Sounds like a good system for you, Autumn! Kind of like a 3-section Action File in drawer form. (https://www.org4life.com/how-to-create-an-action-file-a-k-a-how-to-eliminate-mystery-piles-of-paper/)
Those boxes are great for so many purposes. I always line them up and put the lids underneath. The point is to get rid of all that “back” paperwork in order to prioritize today. Love it!
I agree. I use them all the time!
Great tips for really getting rid of the clutter and not just moving it from one room to another. I love your quote “Be ruthless…” I am going to share that one. Thanks for sharing your tips!
Thanks, Sabrina!
Great post Hazel. I love the way you think. I like your idea of labeling a box “urgent.” So many clients get fearful about putting the important items away during the sorting process.
I’m reminded of a client who wanted every other document to be “on top”, and there were hundreds of documents.
Thanks, Karen! I just think about how I would want access to certain things while the project was underway, but not yet finished.
I love that you included a ‘put away’ box. Best not to interrupt your progress by zig zagging to other rooms. Great suggestion#
Thanks, Sarah! If I had only one organizing tip to make, that might be the one!
This is a fabulous guide. Having so many boxes might be overwhelming for some people, but it would definitely make it easier to keep track of what’s what, especially if you’re unable to do it all in one session.
Thanks, Janet! Yes, I did have one client who couldn’t handle the boxes and we had to find another way. But they work well and save lots of time and sanity in most cases.
Pinned it to my office organizing board. I love those super sticky notes too! 🙂
I’m a fan of those cardboard boxes for a variety of uses. I love how you described the plan for getting the immediate benefit of a clear workspace without doing all the necessary work at once. The keys to your well-thought plan are steps 7 & 8. Without committing the time to go through the sorted boxes, they will continue to weigh on our mind. And without being honest about what items are truly needed, we will end up keeping more than is necessary.
What a great post. You’ve laid the paper decluttering process out clearly. Now people just need to find the motivation to do the work. I find that is a lot of what we do – hold clients accountable.